I hope everyone was as excited as I was when I announced that Skinnytaste meal kits are available for the first time EVER on Home Chef for a limited time through May and June! Get delicious, dietitian-approved recipes with every ingredient you need delivered right to your door. Just look for my Skinnytaste badge on the menu. Use Promo Code: SKINNYTASTE for $90 Off (new customers only)! (more…)
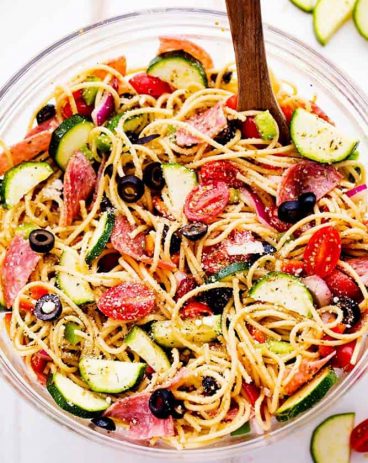
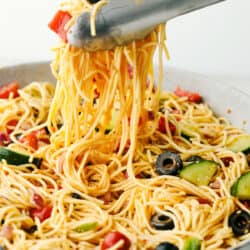
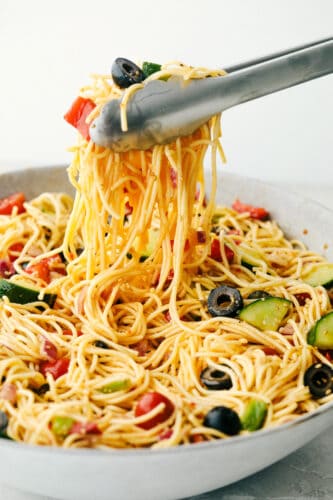
California Spaghetti Salad is a delicious pasta salad filled with fresh veggies and covered in a zesty Italian dressing. With all those flavors and colors making one beautiful and tasty side dish, there is no doubt this will be the hit of your next gathering!
As the weather begins to change and warm up in the Spring, I find myself looking for recipes with a fresher and lighter feel. I especially love quick and easy cold pasta salads! This one only took 15 minutes to make and it was amazing! It is vegan-friendly so it is great to bring to a potluck! It is also super versatile! Have fun choosing colorful, fresh fruits and veggies you love to add in! I sometimes swap out the olives for sun-dried tomatoes and I love it that way too!
You really can’t go wrong with this salad! It is great to make ahead because it tastes better as it sits. I love packing it for my kids in their lunches to change it up from sandwiches every day. We even love taking it on a picnic! It is such a treat! All of the amazing veggies packed inside add so much texture, flavor, and color to the pasta. The zesty Italian dressing coated throughout this pasta is so good. It is the perfect finishing touch to this pasta salad. It is easy to make at home and so incredible! I use it on tons of salads, not just this one! Trust me when I say that this California Spaghetti Salad will be a huge hit wherever it goes!
The Best California Spaghetti Salad Ingredients
Spaghetti: Use thin linguine and break into 1-inch pieces to make it easier to eat.
Cherry tomatoes: Chopped them in half to make them more bite-sized.
Zucchini: Make sure you dice everything to similar sizes as much as possible.
Cucumber: The cucumber gives this salad the fresh taste I love.
Bell peppers: I used red and green but swap for yellow peppers if you prefer. Make this recipe your own!
Red onion: If you don’t like biting into the raw onion, marinate them in the dressing first to lessen their strong flavor.
Olives: The olives are very salty and delicious!
Salad Dressing Ingredients
Italian salad dressing: Use any Italian dressing you love because you are going to amp it up with all the other seasonings to create your own version of this staple dressing.
Parmesan cheese: Grated and combined with the dressing to cover each part of the salad with its great nutty flavor.
Sesame seeds: Add a rich, nutty flavor to the dressing.
Paprika: Adds great color to this dressing.
Celery seed: These little seeds pack all the powerful flavors of celery- earthy, grassy and slightly bitter- that balance out this dressing.
Garlic powder: The extra garlic powder helps the flavor stay strong even when chilled.
How to Make Spaghetti Salad
Cook the pasta: Make according to package directions. Drain and rinse in cold water.
Combine all ingredients: Add cherry tomatoes, zucchini, cucumber, green and red bell pepper, red onion and olives to the pasta in a large bowl.
Make the dressing: Whisk together Italian salad dressing, Parmesan cheese, sesame seeds, paprika, celery seed, and garlic powder.
Toss the salad in dressing: Pour dressing over salad and toss until coated. Cover and refrigerate for 3 hours or overnight.
Tips for making the Perfect California Pasta Salad
Vegetables: Get creative with this versatile dish and swap out vegetables. For example, try favorites like broccoli or yellow and orange bell peppers.
Pasta: Use other pasta shapes. Some of my favorites like rotini or farfalle would work fantastic!
Cooling Pasta:This pasta salad is best when it’s fresh out of the fridge. So, keep it cooling until right before serving.
Make it Ahead: This is a great make-ahead recipe! It’s even better the next day, so I usually make it the day before and store it in the refrigerator overnight. This really gives all the flavors time to combine and soak into the pasta!
Pasta Tip: After draining the salad, dunk the pasta in an ice bath (equal parts water and ice in a large bowl) to shock them. Then, your noodles will not soak up too much of the dressing and become gummy.
Best Places to Take California Spaghetti Salad Dish
BBQ or Potluck: A cookout with friends and/or family. As the weather warms up, a cool salad is a perfect side!
Family Gatherings: Family reunion in a pavilion by the river. This dish travels well, just keep it in the cooler until right before you serve.
Work Lunch: Potluck at work. (Depending on where you work )
Lunches! This salad keeps well in the fridge for 5 days so it is perfect for make-ahead weekly lunches!
California Spaghetti Salad is a delicious pasta salad filled with fresh veggies and covered in a zesty Italian dressing. With all those flavors and colors making one beautiful and tasty side dish, there is no doubt this will be the hit of your next gathering!
Cook the pasta according to package directions. Drain using a colander and rinse in cold water. Add cherry tomatoes, zucchini, cucumber, green and red bell pepper, red onion and olives in a large bowl.
To make the dressing:
Whisk together italian salad dressing, parmesan cheese, sesame seeds, paprika, celery seed, and garlic powder. Pour over salad and toss until coated. Cover and refrigerate for 3 hours or overnight.
Video
Notes
Updated on April 30, 2021Originally Posted on May 29, 2015
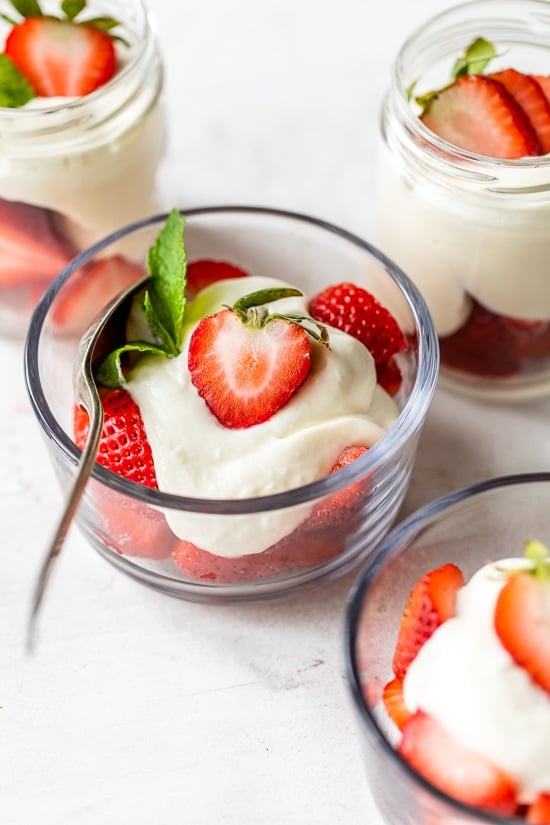
This lighter Strawberries and Cream folds Greek yogurt right into the whipped cream for a healthier (and yummier) spin on the classic!
Strawberries and Cream
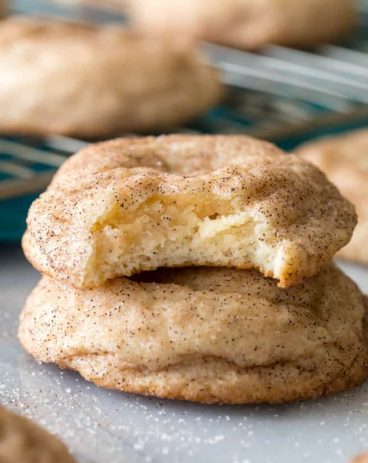
On weekends, I occasionally like to treat myself to dessert. If you’ve never made whipped cream from scratch before, you’re in for a treat! One of my favorite ways to lighten whipped cream is to whip it up and fold in some Greek yogurt. It gives it a slight tang, which is wonderful with fruit and cuts down on the fat and calories. Perfect for a quick and easy dessert, or try them in crepes or on Yogurt Waffles.
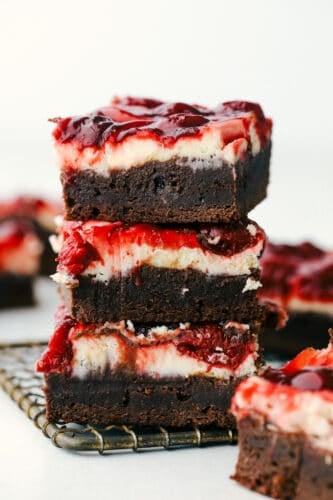
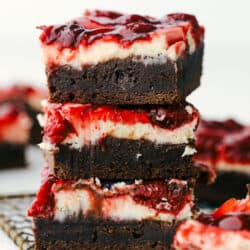
Cherry cheesecake brownies are fudgy brownies with cheesecake and premium cherry pie filling swirled on top! These brownies are rich and creamy and have three delicious desserts in one!
I am so excited to be an ambassador this year for Lucky Leaf pie filling! I love working with companies that I love and that I am passionate about their product. Lucky Leaf is a high-quality and easy-to-use dessert product. I love thinking of delicious recipes to create with their premium pie filling. You are going to love lucky because it has no high fructose corn syrup and has more fruit inside and a bunch of different flavors to chose from. It is very convenient and versatile with a high-quality product to use to simplify your baking.
Cherry pie filling is one of my all-time favorite pie fillings. And Lucky Leaf’s is bursting with big and delicious cherries inside. You can truly see a difference in their pie filling. So when choosing a dessert to make, I knew that I wanted to use it. So then it came to me. Why don’t I combine three of my favorite desserts in one!? And that my friend, is how the Cherry Cheesecake Brownie was born!
What You Need To Make Cherry Cheesecake Brownies
These are not only rich and fudgy, but they are sweet, tart, and tangy. It is all the best flavors combined into one outrageously delicious dessert! This dessert turned out way better than expected. I could hardly wait for them to cool and set. My cherry-loving 7-year-old kept sneaking cherries from the top. Apparently, he couldn’t wait either!
Cream cheese: Soften the cream cheese or at least have it at room temperature.
Sugar: White sugar to sweeten the tang of the cream cheese.
Egg: Should be a room-temperature egg.
Vanilla: This adds a nice sweet flavor to the cream cheese.
Brownie Ingredients
Butter: You will melt this butter with the chocolate
Unsweetened chocolate: Use good quality cocoa for best results.
Sugar: White granulated sugar adds moisture as well as sweetness.
Vanilla: This adds one of the best flavors that combines beautifully with the cherries.
Salt: Salt balances out the flavor and the sweetness.
Eggs: Again, have these at room temperature, they will mix in the batter better.
Flour: All-purpose flour works perfectly here.
Lucky Leaf® Cherry Pie Filling 21 ounces: Look for it at your local grocery store or online.
How to Make the Best Brownies EVER!
My favorite part of these brownies was the cheesecake and cherry swirled on top. It looked so beautiful on top and it made these brownies look elegant and impressive. The best part about these brownies is that they are simple to make! They only take about 15 minutes to put together until they are baking in the oven. Heat oven to 350 degrees. Line a 13×9 inch pan with foil and spray lightly with cooking spray. Set aside. Beat together cream cheese, and sugar until smooth. Add in egg and vanilla and continue to beat until smooth.
How to Make the Brownies
Melt and Combine: In a microwave-safe bowl, melt butter and chocolate 30 seconds at a time until melted and smooth. Stir in sugar vanilla and salt. Add in eggs and flour. Mix until incorporated.
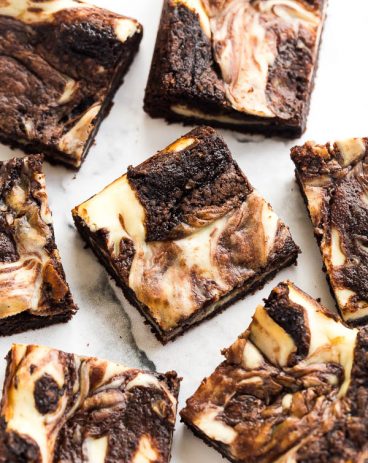
Layer and Swirl: Spread brownie mix into the bottom of your 13×9 inch prepared pan. Drop Cheesecake mixture on top followed by the Lucky Leaf Cherry Pie filling. Run a knife through the top giving it the marbled look.
Cook and Cool: Bake for 45-50 minutes until the cheesecake states to turn lightly brown on the edges. The cheesecake center will still jiggle a bit. Cool completely and chill for 4 hours before cutting.
Brownie Cheesecake Tips and Variations
As soon as the brownies were cooled and chilled I couldn’t wait to sink my teeth into them! The first bite seriously blew my mind. I could taste the creamy cheesecake and delicious cherries in my mouth followed by a fudgy brownie. These will go down in the history books as one of the best brownies that I have ever had! I think as soon as you try them you will agree.
Room Temperature Ingredients: For those of you who follow me you know that this is a must when baking. When your ingredients are at room temperature they mix in better, meaning whatever you are baking will turn perfectly, without lumps or chunks.
Add-Ins: To make this dessert even that much more decadent, stir in chocolate chips or chopped pecans into the brownie batter.
Can I use a Box Brownie Mix: Yes, of course. Personally, I love homemade brownies better, but I also know that when I need to save time I reach for boxed mix every time. They will still taste amazing!
Change up the filling: Not a fan of cherries? You can substitute with another pie filling you love. Try strawberry or raspberry.
Let them Cool: Before you cut them be sure to let them cool. If they are too warm you will end up with a gooey mess. I like to refrigerate them before I cut them.
How to Store Your Cherry Cheesecake Brownies
These brownies are rich and decadent, you want to make sure you keep them around as long as possible.
Fridge: Because these cherry brownies are made with cream cheese for their cheesecake layer, they should be refrigerated. Do not cut them if you are storing them. They tend to dry out faster if you do. These will keep well covered for up to 5 days.
Freeze: These Cherry Cheesecake Brownies are awesome frozen. Again leave them uncut if possible, wrap tightly in plastic wrap, and then with foil. These will keep for up to 1 month. Let thaw in the fridge.
More Cheesecake Recipes to Fall in Love With
I love baking with cream cheese. It is rich, creamy, and has the yummiest smooth flavor. Creamy cream cheese desserts are indulgent comfort foods that go with so many different flavors. They add that extra special touch that elevates your dessert from ordinary to extraordinary. If you serve something with cream cheese in the title, it’s always the first to be devoured. These Cherry Cheesecake Brownies are just the beginning of all the goodness you can make with cream cheese. These are just a few of many tried and true you can find here on my blog.
Cherry cheesecake brownies are fudgy brownies with cheesecake and premium cherry pie filling swirled on top! These brownies are rich and creamy and have three delicious desserts in one!
Heat oven to 350 degrees. Line a 13×9 inch pan with foil and spray lightly with cooking spray. Set aside.
To make the topping:
Beat together cream cheese, and sugar until smooth. Add in egg and vanilla and continue to beat until smooth.
To make the brownies:
In a microwave-safe bowl, melt butter and chocolate 30 seconds at a time until melted and smooth. Stir in sugar vanilla and salt. Add in eggs and flour. Mix until incorporated.
Spread brownie mix into the bottom of your 13×9 inch prepared pan. Drop Cheesecake mixture on top followed by the Lucky Leaf Cherry Pie filling. Run a knife through the top giving it the marbled look.
Bake for 45-50 minutes until the cheesecake states to turn lightly brown on the edges. The cheesecake center will still jiggle a bit. Cool completely and chill for 4 hours before cutting.
Video
Notes
Updated on April 29, 2021Originally Posted on February 15, 2015


 Best Places to Take California Spaghetti Salad Dish
 )
)